In this guide
At last it was time to pour the foundation. My wife had taken the day off work, it was early morning, and we were getting everything ready for the concrete truck. We’d bought all the anchor bolts we needed, plus a couple of extras just in case.
The anchor bolts
The anchors are basically J-bolts. The hook on the end holds them securely in the concrete. They come with a large washer and nut, which are used later to fasten the wall framing to the foundation. They come in several lengths; ours were 10 inches, and I cleared them with the inspector before buying to make sure they were long enough.
I removed the nuts and washers and stored them. Then I wrapped a piece of black tape around each bolt to mark how deep to set it. Since framing lumber is 1½ inches thick, I put the tape about 3 inches from the top so there’d be room for the washer and nut with a little to spare.
Planning anchor locations
It’s important to know exactly where every anchor goes ahead of time. You don’t want to be measuring while your concrete is setting. You can buy large construction crayons where chalk lines and tape measures are sold; I used them to mark on the top blocks exactly where each anchor would go.
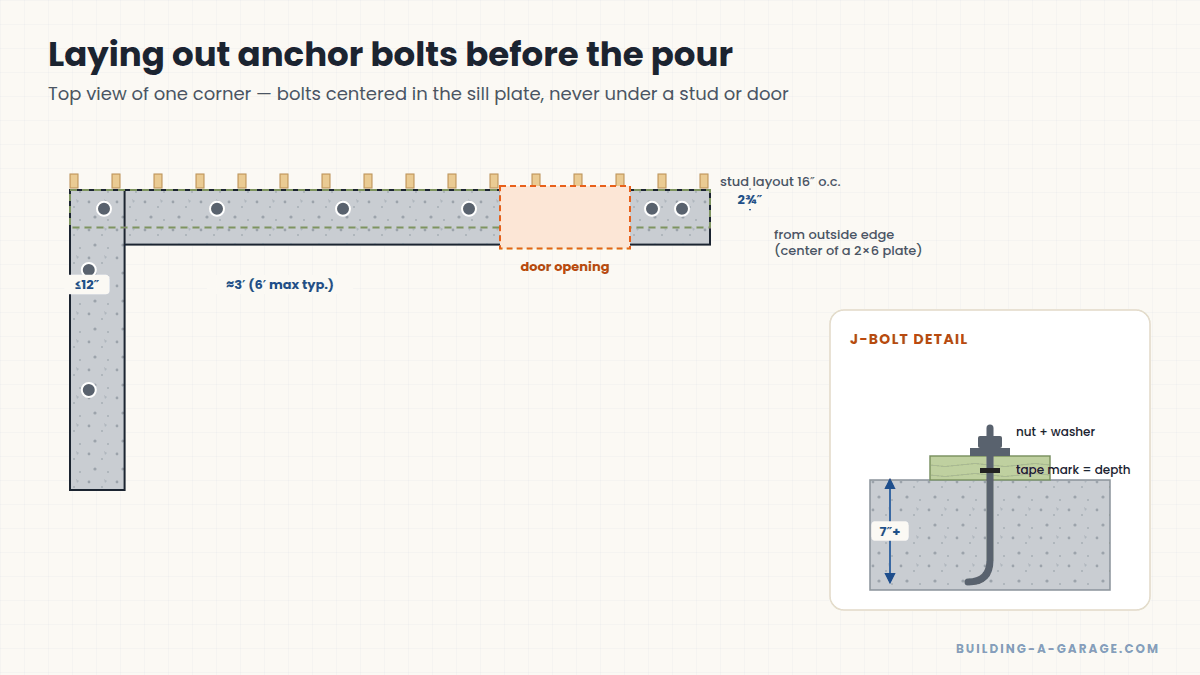
The framing lumber sits on the outside edge of the foundation walls, and the anchors need to be centered in the lumber. So measure half the width of your wall lumber in from the outside edge of the foundation and draw a line all the way around the top of the wall.
- For 2×4 walls, the anchor centers are about 1¾ inches from the outside edge.
- For 2×6 walls, they’re about 2¾ inches from the outside edge (what I used).
Then I marked exactly where each anchor would go. The corner anchors had to be within 12 inches of the corner, and after that my plans called for anchors about every 3 feet.
Don’t put a bolt under a stud
This was harder than it seemed. I worked out in advance exactly where every stud would land and made sure no anchor sat on a stud location. I also marked where the garage doors and people door would be so I didn’t put anchors in those openings.
The truck arrives
The driver looked over the site and parked where he could unfold the conveyor. He ran it with a remote control box, and in a couple of minutes the belt was extended. He attached a tube to the end that I used to guide the concrete. At first the concrete was too stiff and wouldn’t come out onto the conveyor, so he added some water and let it mix a few minutes. Before long we had something we could work with.
Careful with added water
A little water can make concrete workable, but too much weakens it and increases cracking. If your plans specify a strength, ask the plant for a mix designed to flow (or a plasticizer) instead of adding lots of water on site.
The pour was messy. Concrete doesn’t come out slowly and smoothly — it comes in large, fast-moving clumps. We quickly realized we should have had one more helper, but the driver grabbed a shovel and helped (we gave him a good tip). I held the tube and guided the concrete, my wife smoothed the top and shoveled spills where they needed to go, and the driver helped when she fell behind.
The pour was over so fast that we barely realized it had started. We rolled a wheelbarrow to the truck, the driver dumped the leftover concrete into it, and we used that to fix any low spots as we checked everything.
Setting the anchors
We were exhausted and needed a break, but there was no time. It was a warm, dry day, and the anchors had to go in immediately. While the driver cleaned his truck, my wife and I set anchors, starting where we’d started pouring so we’d be working with the stiffest concrete first. She placed each anchor while I checked it with a level to make sure it was plumb. By the time we finished, the concrete was getting quite firm. At last, we were done for the day.
Curing and backfill
Concrete exposed to dry air can end up weak and cracked, so it’s important to keep exposed concrete moist as it cures. That lets it harden evenly instead of forming a dry crust over wet concrete. I used a garden pump sprayer and lightly misted the top about once an hour through the day, less often after sunset, and a few more times the next day.
After about three days I began backfilling with the mini excavator. It was surreal: what had been a giant square trench in our yard for over a year was suddenly just a few inches of concrete sticking out of the ground with some bolts in it. The backfill hid 30 inches of foundation — but I still had my memories (and nightmares). It was fun to drive the cars in where I had the door openings marked and see how much storage room I’d have.
Inspection time
It was time for my first real inspection. I called the county and left a message saying I was ready, and I left one of the extra anchor bolts in my inspection mailbox so the inspector could see exactly what I’d used. I never saw him come out, but within a couple of days my inspection card had its first signature. Woohoo! It was finally time to move on to framing.
Key Takeaways
- Mark every anchor location before the truck arrives; avoid studs and door openings.
- Anchors go within 12 inches of corners and at the spacing on your plans (6 feet is a common maximum).
- Have at least three people for a pour, and set anchors right away.
- Keep new concrete damp while it cures.
Frequently asked questions
How far apart should anchor bolts be?
Many codes allow ½-inch anchor bolts up to 6 feet apart, with a bolt within 12 inches of each end of every sill plate piece and at least 7 inches of embedment. High-wind or seismic designs (like mine) often call for closer spacing — follow your plans.
How long before I can build on new concrete?
You can usually start light framing after a few days, but concrete keeps gaining strength for weeks. Avoid heavy loads for at least a week and follow your engineer’s or supplier’s guidance.

Leave a Reply