In this guide
The first step in digging the foundation trench was to rope off the dig area. The bottom layer of blocks — the footer — was going to be turned 90 degrees to the rest, giving the foundation a width of 16 inches.
Marking out the trench
I knew the trench needed to be at least 16 inches wide. It also needed to be about three and three-quarter blocks deep, which is about 30 inches. I measured out a 32×24 area that was 16 inches wide and marked it all with stakes and twine. Before long I’d dug up most of the twine and some of the stakes, but I knew basically where I was going.
Use batter boards
Stakes and string right on the dig line don’t survive an excavator. Batter boards set a few feet outside each corner hold your string lines safely out of the way, and you can re-stretch them whenever you need to check your layout.
My first mistake: the block module
At this point I had already made my first mistake. My garage was never going to be a perfect 32×24, no matter how hard I tried, because I was using concrete block — and there’s no way to get exactly 32×24 from 8×8×16 blocks. I ended up needing something like 31′6″ by 23′4″.
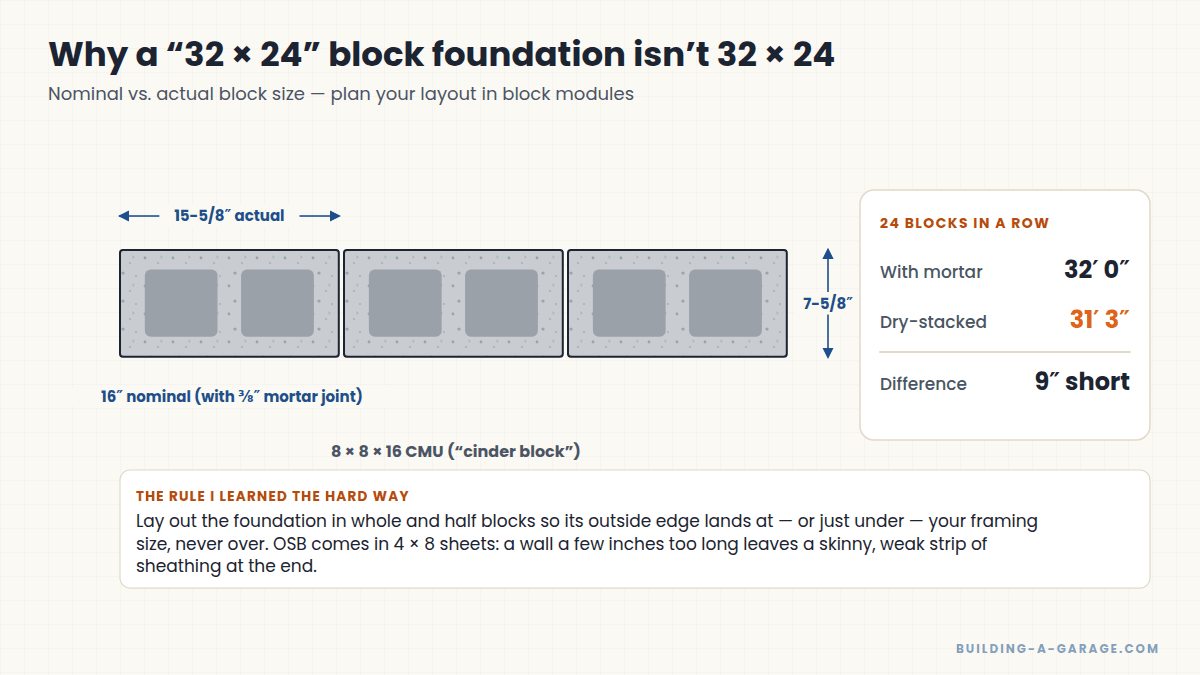
It was important to be undersized rather than oversized so my framing would still go together properly. OSB comes in 4×8 sheets; if my garage had been 32′8″, I’d have had a tiny strip of OSB at the end of each wall, which isn’t good structurally.
So my trench was too big, and I had to correct for it later as I laid block.
Leveling the trench bottom
One bad thing about a block footer is that the bottom of the trench has to be as close to perfectly level as possible. I bought an inexpensive laser level, leveled it at one end of the trench, and checked where the beam hit at the other end. That got the bottom reasonably flat.
The real work of getting it perfect waited until I placed the blocks. Then I set the laser at the exact height of the tops of the blocks and made them all match. I never got them perfect, but within about an inch from one end to the other seemed to be fine.
In retrospect: pour the footer
It would have been better to have the footer poured instead of using block. It would have meant another trip for the concrete truck and cost more, but I could have used forms and screeded the top of the concrete level — far easier than getting the bottom of a trench perfectly flat. Oh well, it only added about a month to the workload!
Breaking through granite
Digging took a huge amount of time because of the granite. My mini excavator could only do so much.
- Air chisel: I already had an air compressor, so I bought an air chisel to see how well it broke granite. It did an amazing job of breaking much of the rock into pieces I could dig out.
- Electric jackhammer: Some areas were too solid for the chisel, so I rented an electric demolition hammer (a Bosch “Brute”). It ran on a normal 15-amp household circuit with about a 50-foot extension cord. Not as fast as an air-powered jackhammer, but easy for an amateur to use.
After a few weeks, I finally had a trench that seemed good enough to start laying block.
Protect yourself
Breaking rock throws chips and silica dust. Wear safety glasses, hearing protection, gloves and a proper dust mask or respirator, and never work in a trench deep enough to collapse on you without shoring or sloping the sides.
Key Takeaways
- Plan block foundations in block modules — never larger than your framing size.
- A cheap laser level is the best tool for leveling a trench and a footer.
- Rock changes everything: budget time (or money) for breaking it.
Leave a Reply