In this guide
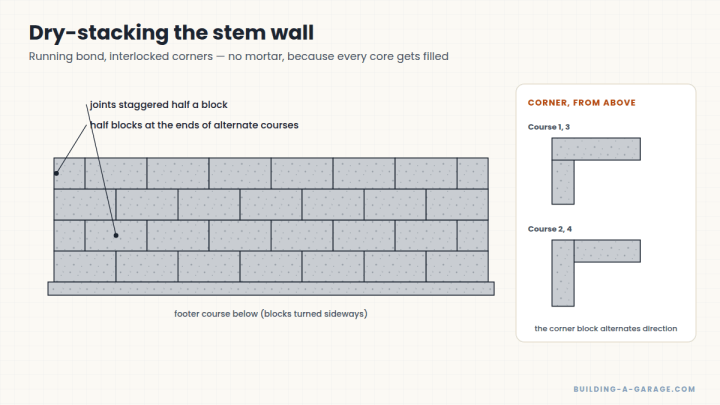
My foundation consisted of two basic parts. The bottom layer of block, called the footer, was 16 inches wide. On top of that sat the actual foundation walls, with the blocks turned so they were 8 inches wide instead of 16. So the narrow foundation walls sit on top of the wide footer.
Why the footer matters most
The footer is the most critical piece of the foundation, because if it isn’t square, flat and level, you’ll be correcting for those problems throughout construction. Believe me, you don’t want to be applying corrections to all your measurements — it’s complicated enough when everything is perfect.
Test-fitting the block
I started by buying a few truckloads of block to experiment with. I got mine from a building supply store where I could drive up to a full pallet (75 blocks) and they’d load it into my truck with a forklift. By the way, 75 blocks is very heavy — make sure your truck can handle it.
I laid a test footer just to see how things were turning out.
Squaring with the diagonals
The trick to making the footer square is measuring the diagonal corners. They should measure exactly the same. If they’re off, your garage will be a parallelogram, and you don’t want that.
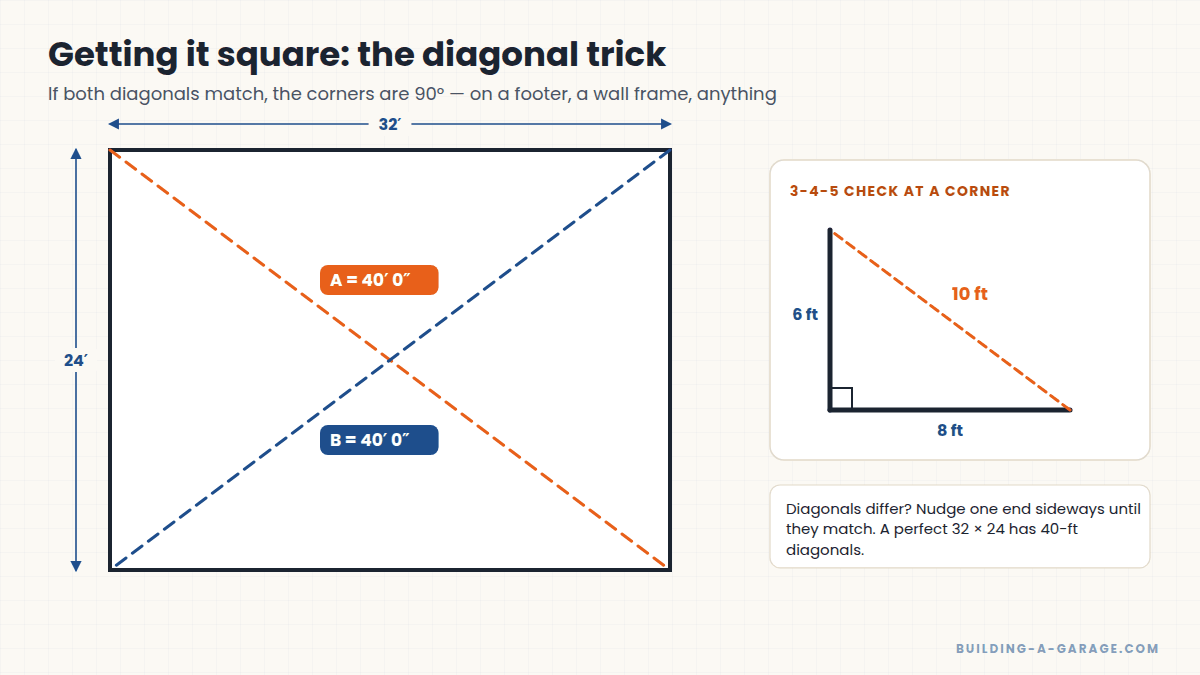
A handy fact: a perfect 32×24 rectangle has diagonals of exactly 40 feet (it’s a 3-4-5 triangle scaled up by 8). For smaller checks at a corner, measure 6 feet along one side and 8 feet along the other; the distance between those marks should be exactly 10 feet.
Planning the block count for each leg
This is when I first noticed my blocks weren’t lining up to a perfect 32×24. Then I realized the foundation walls on top wouldn’t be 32×24 either. I had to work out — in my head and on scratch paper — how many blocks each leg of both the footer and the walls needed to get the garage as close to (but not over) 32×24 as possible.
Framing sits on the outside edge
The wall framing rests on the outside edge of the foundation walls, so water can’t sit on the foundation and rot the framing. That means it’s the outside edges of the foundation walls that need to come as close as possible to your framing dimensions.
Once I’d figured that out, I fired up the excavator again and adjusted the trench slightly based on the new numbers.
Test, adjust, repeat
My test run of footer blocks was terribly crooked and nowhere close to level. That was okay — that’s why I was testing. I made notes on areas to dig differently, re-estimated everything to within an inch, pulled up the test blocks, and fixed my trench so it was as close to perfect as an amateur could get it.
Key Takeaways
- The footer sets the accuracy for everything above it.
- Equal diagonals = square. A 32×24 rectangle has 40-foot diagonals.
- Plan block counts so the outside of the stem wall matches your framing.
- Dry-fit first; it’s much easier to fix a trench than a foundation.
Leave a Reply