In this guide
Now it was time to lay the footer. Actually, an entire winter passed between the last article and this one, so first I had to dig out some cave-ins that happened during the time off.
Drilling the blocks for rebar
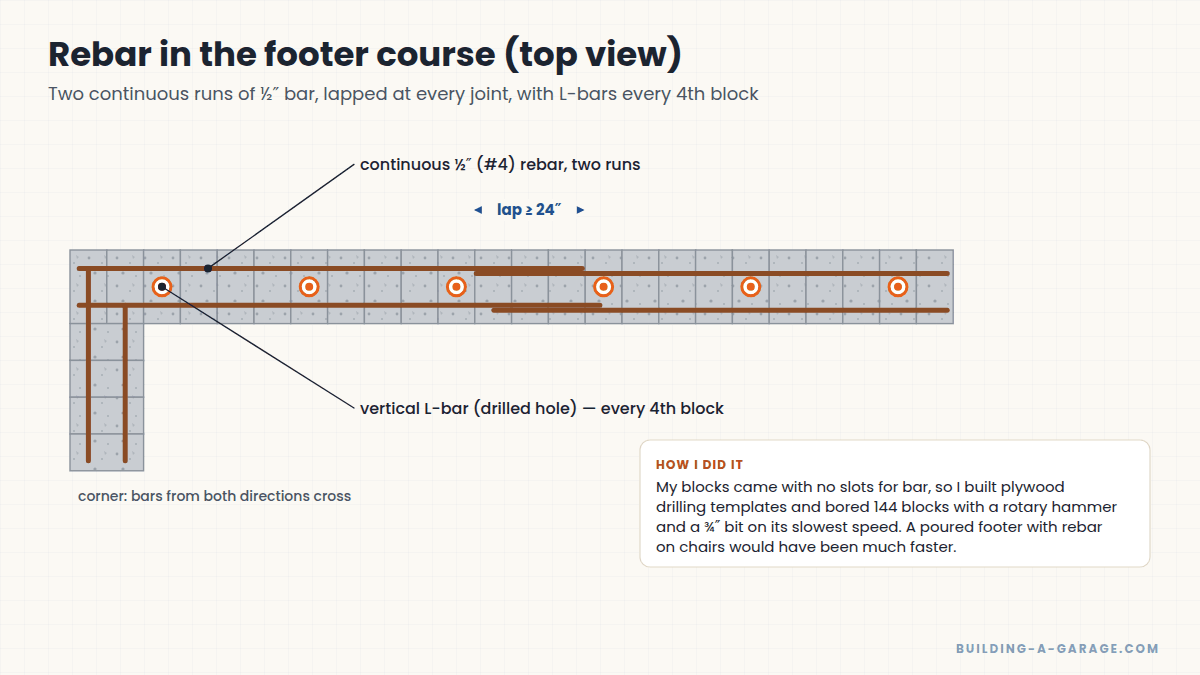
The footer blocks needed two pieces of ½-inch rebar running through them, tying them all together. Every fourth block also needed a slot in the center to hold an L-shaped bar that went up through the foundation walls. That meant drilling holes in block — lots of holes.
I bought a cheap hammer drill from a home improvement store and quickly realized it was not what I needed. Then I found a local tool store that had just bought out another store’s inventory, and they had a stock of Milwaukee rotary hammers for super cheap. I bought one and a ¾-inch bit. The ¾-inch hole was just right for ½-inch rebar without having to beat the bar through.
I quickly learned to use the slowest drilling speed possible to avoid damaging the blocks — I reduced a couple of blocks to dust before I figured that out. Remember, these blocks get filled with concrete anyway, so weakening them a little isn’t a big problem.
Overlapping the bar
My supplier sold ½-inch rebar in 10-foot lengths, so I overlapped each section with the next by a couple of feet, drilling two holes side by side wherever they overlapped.
How much overlap?
Rebar splices need enough overlap to transfer the load from one bar to the next — commonly around 40 to 48 bar diameters, which is 20 to 24 inches for ½-inch (#4) bar. Your plans or engineer will specify the lap length; use it.
Drilling templates
I had a lot of blocks to drill — 144 if I remember correctly. Marking every drilling spot was taking far too long, so I built templates out of strong wood: two templates that could be rotated or flipped to create every drilling pattern I needed for the overlapping bars. To drill a block, I identified the pattern, laid the matching template on top, and started drilling. Once everything was set up, it went extremely fast.
Laying and leveling the footer
Once I had a bunch of blocks drilled, I started laying them out. The end blocks needed rebar entering from two directions, so they needed more holes (two blocks at each end).
- I laid one end first, leveling it perfectly by digging or adding dirt and compacting as needed.
- I set my laser level on top of the first two end blocks.
- I kept laying and leveling blocks until I was just past 10 feet, then shoved in the first rebar.
- I laid about another 8 feet and pushed in the next bar, making sure it overlapped the first where I’d drilled the double holes.
- I continued to the end of the row, leveling and straightening as I went.
Each row took one or two days, because as always I ran into little unexpected things — like rock in my way.
The end-of-row surprise
When I got to the end of my first row, I realized I had a problem: there was no way to insert the rebar. I finally figured out I’d have to dig some extra trench at the end of each row so I could slide the bars in through the end blocks.
Overlapping four pieces of rebar at the end of each row was quite difficult, and my pattern didn’t always line up the way I’d planned. But eventually the work got done, and it looked like a professional had planned it that way, so I was happy.
If I did it again
I’d pour the footer instead of using block. With a poured footer you just lay the rebar in the forms, support it on pieces of brick or rebar chairs, tie it with wire, and pour. It would have been so much faster than drilling blocks.
Key Takeaways
- A real rotary hammer on slow speed is the right tool for drilling block.
- Build templates for repetitive drilling patterns.
- Plan how you’ll get bars into the last blocks before you set them.
Leave a Reply