In this guide
On a flat area of ground, I laid out the framework for the first wall before I drove a single nail.
Lay out the parts
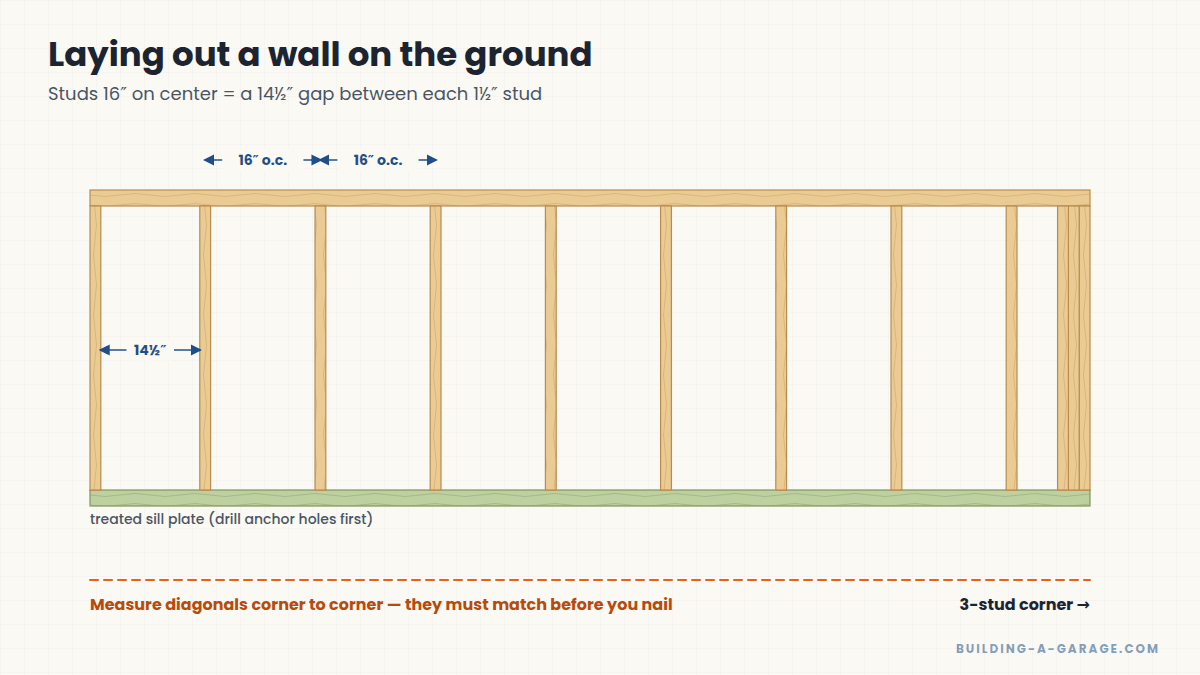
- Lay out the treated sill plate lumber, butting the ends together, and cut the end so the plate is 5½ inches shorter than the foundation.
- Measure where each anchor-bolt hole will be drilled in the sill plate and mark the locations. Make sure no studs land on your anchor marks. If one overlaps, place that stud just to the left or right — it makes nailing the OSB a bit harder, so hopefully it won’t happen to you.
- Starting at the end closest to the garage doors, place a 92⅝-inch stud at the very end. Make sure it sits on top of the treated sill plate, not beside it — you don’t want untreated lumber touching concrete.
- Measure 14½ inches and place the next stud. With 1½-inch-thick studs, that puts them 16 inches on center. If your spacing is different, adjust accordingly.
- Continue at 14½-inch gaps to the end. For the last stud, don’t measure — just place it at the very end, on top of the sill plate like the others. Then place one more stud right next to it, and one more next to that. That builds the 3-stud corner.
- Set the first board of the double top plate on top. Again, use the longest lumber you can; it doesn’t need to be treated.
- Butt the top-plate boards together to the end, but don’t cut the last board yet.
Mark the plates together
Pros often lay the sill and top plates side by side and mark the stud locations on both at once with a square. That guarantees the studs are perfectly parallel and on layout.
Measure, and measure some more
Now it’s starting to look like a wall lying on the ground, but it isn’t true yet unless you’re a miracle worker. To make sure it’s square, measure the diagonals — they must be exactly the same. Measure from one corner to the opposite corner, write it down, then measure the other diagonal. They’ll probably be different the first time. Adjust the boards until the diagonals match.
Once the measurements are perfect, you can cut the end of the top plate. I used a grease pencil to mark the centerline of each stud on the top and sill plates, so that while nailing I could correct any accidental movement without throwing the whole wall out of square.
Nailing
Now that everything is square, you can finally use the nail gun. Since the wall is flat, nails go through the bottom of the sill plate into the studs, and through the top of the top plate into the studs.
- 2×4 walls: 2 nails (16d) at each stud end.
- 2×6 walls: 3 nails (16d) at each stud end.
Keep checking that everything stays square, and remember to nail the three corner studs together (10d), not just to the plates.
Drill the anchor holes
Drill anchor-bolt holes at each mark on the sill plate. They need to be accurate, or you’ll be doing it again while your friends get tired of holding the wall up. Drill them slightly oversized (about ⅛ inch larger than the bolt) for a little wiggle room.
Lifting safety
A 32-foot 2×6 wall is heavy and catches wind like a sail. Plan the lift, have enough people or equipment, and have temporary braces cut and ready before the wall goes up.
Key Takeaways
- 14½-inch gaps between 1½-inch studs = 16 inches on center.
- Equal diagonals before nailing; mark stud centers so you can correct drift.
- Keep untreated lumber off the concrete.
- Drill anchor holes accurately before lifting.
Leave a Reply