In this guide
Setting trusses is the most dangerous part of building a garage. A row of unbraced trusses can fold over like dominoes, taking anyone standing on them along. Done carefully, though, roof framing goes up remarkably fast.
Before the truck arrives
- Make sure the walls are straight, plumb, braced and the top plates are complete.
- Mark truss locations on the top plates (usually 24 inches on center) on both walls.
- Stack the trusses flat on blocking, off the ground, near the building.
- Line up enough helpers — or rent a boom truck or crane for the lift.
- Read the truss company’s bracing instructions (BCSI).
Setting the first truss
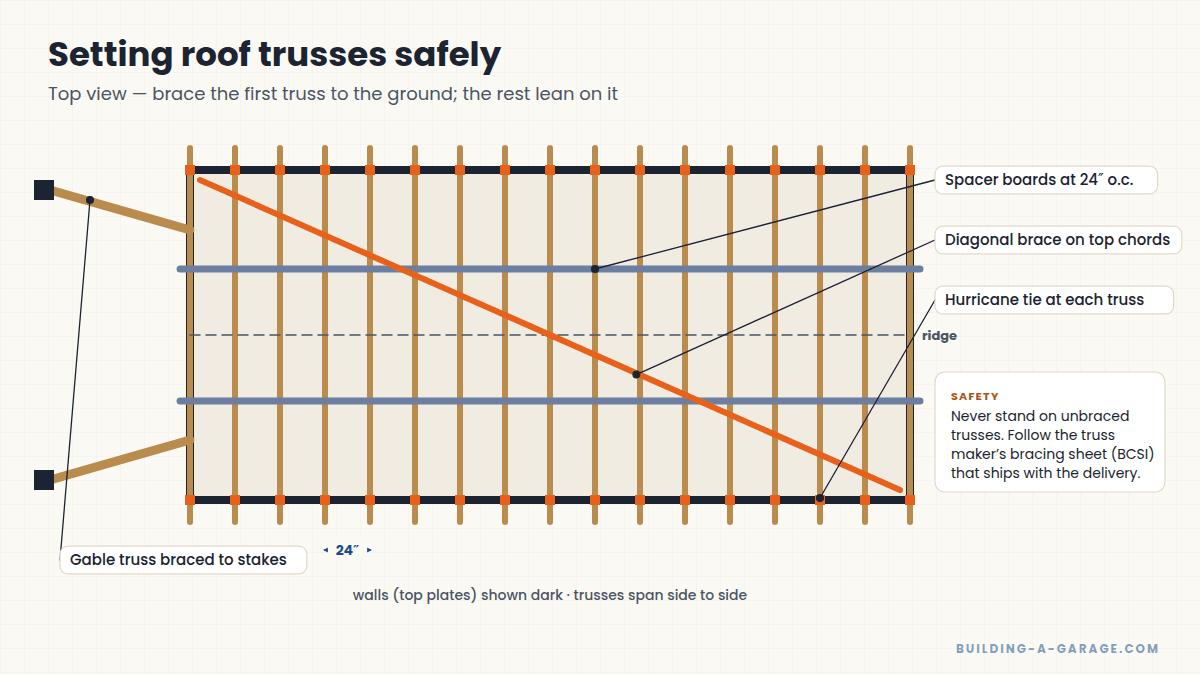
The first truss — usually the gable end — is the anchor for everything else. Stand it on its marks, plumb it, fasten it to the top plates, and brace it firmly to stakes in the ground or to the building so it can’t move in any direction.
Setting the rest
- Lift each truss onto the walls upside down (peak down), then rotate it upright at its marks.
- Fasten it to both top plates with the connectors on your plans — usually hurricane ties or truss clips at every bearing point.
- Hold it at the correct spacing with spacer boards pre-marked at 24 inches, nailed across the top chords near the ridge and partway down each side.
- Check plumb every few trusses.
- Add diagonal bracing across the top chords as you go, and install any permanent lateral bracing called for on the truss drawings.
Never skip temporary bracing
Most truss collapses happen during installation, before the sheathing goes on. Brace the first truss to the ground, keep spacer boards and diagonals going as you set each truss, and never stand on trusses that aren’t braced.
Overhangs and fascia
Once the trusses are set, snap a line along the tails, trim them to length if needed, and install the sub-fascia or fascia board. Straight fascia makes the whole roof look professional, so take the time to get the line right.
Framing inspection
Many inspectors want to see the trusses, hurricane ties and bracing before the roof sheathing hides them, or at least before insulation and siding. Check your card and ask if you’re not sure.
Key Takeaways
- The first truss must be braced rock-solid before anything else.
- Space, fasten and brace every truss as you go.
- Keep the truss company’s bracing sheet on site and follow it.
Frequently asked questions
How far apart are roof trusses on a garage?
Usually 24 inches on center, but always follow the truss layout provided by the truss manufacturer and your plans.
Can I set trusses myself?
Many DIYers do with enough help, careful bracing and a plan for lifting. For large or heavy trusses, renting a boom truck or hiring a crane for a few hours is safer and often faster than trying to push them up by hand.
Leave a Reply